Pencil Sketch Photo Biography
Source(google.com.pk)Fantasy artists use imagination as a basis for their creations, they utilize some form of realism, cleverly intertwined with the extraordinary to create powerful art. Fantasy artists often use precise techniques to realistically portray the texture, structure and lighting of objects from reality together with imaginary elements, (monsters, wings etc.) challenging our perception of of the world and stretching the boundaries of our imagination. Pencils, because of their accuracy can be daunting but equally beautiful, ideal for photo realism to cartoons and obviously, fantasy art.
As fantasy art often demands realistic and precise drawing I am concentrating on more refined drawing techniques, although I will briefly touch on sketching skills.
Getting Started
Once you have decided on your subject, you will need to choose the best techniques and materials for your work of pencil genius.
Pencils, a Brief Overview
Pencils range in hardness and blackness from 9H to 9B. Pencil manufacturers use the letter "H" to indicate a hard pencil and "B" to designate the blackness of the pencil's mark. The letter "F" indicates that the pencil sharpens to a fine point. 9H pencil is the hardest pencil available. 9B is the softest pencil you can get and it will create the darkest lines. My ‘pencil kit’ ranges from 2H to 2B, but I recommend using up to a 6B for deep shadows and bold, dark lines. You will find that any harder that 2H is quite difficult to use and may create dents in your paper.
For fine details, you will often require a sharp pencil, or a mechanical pencil. Using a sharp or mechanical pencil with keep all your strokes fine and small.
Paper & Other Materials
You will also require good quality paper, an eraser and a sharpener. Make sure you have a clean and uncluttered desk to draw on, or if that is impossible or you are outside, draw on a solid clipboard with a bulldog clip to stop your paper from flying.
You might find the kneaded rubber eraser to be an invaluable tool for eliminating erroneous lines and softening tone as you have a lot more control than a generic rubber. Using a patting technique you can gently lighten areas which are too dark, or to harmonize incongruent tone. (Or you might find it a complete waste of money, as personally, I hate kneaded erases, they are too malleable, and when molded to a fine point never stay that way.)
Your papers’ texture can drastically determine the kind of drawing you will create, and may require different pencils. Drawing realistically, with plenty of details requires smoother paper, characterized by not very much tooth (texture) so that the individual pencil strokes are barely evident. Rough paper holds more graphite than smooth paper, allowing your drawings to have deeper shadows, and more contrast, though the grainy texture of rough paper makes it difficult to render fine detail. Drawing on smooth paper requires softer pencils to create dark shades.
Medium paper give the best of both worlds (purchase it if you are unsure of your own preference), paper with enough ‘tooth’ to grasp the graphite without producing a metallic sheen, but smooth enough to allow for the application of relatively fine detail. I draw on 100% cotton Rag paper, which is long lasting and gives me the freedom to watercolour my drawings.
Holding Your Pencil
To draw with a pencil skillfully you must be able to hold your pencil in a comfortable position where you have optimal control. If you have pain in the hand or shoulder after a long drawing session, it could be an indication of holding your pencil ‘incorrectly’. Don’t grip relentlessly to your pencil, and drive it into your paper with your entire body weight! The paper is not your enemy, soothe it with delicate, beautiful pencil stokes and it with reward your poise with a lovely drawing.
There is no real ‘correct’ way to hold a pencil when drawing; it is a matter of personal preference, and comfort. Experiment with different grips (perhaps the way you hold your fork or maybe in a similar way to how you hold chopsticks).
Drawing Techniques
The technique you use will habitually be determined by the initial purpose of your drawing, or the aspirations you have for the illustration. Sketching for a watercolour would require an entirely different technique than that for a detailed photo-realistic drawing. You have most likely seen the techniques cross-hatching, circles, scribbles and contour lines and you may have even experimented with a couple, but have you ever completed your final work with these techniques?
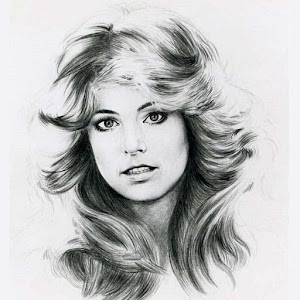
Pencil Sketch Photo Photos Wallpapers Images Pics Collections
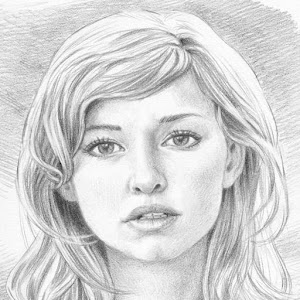
Pencil
Sketch Photo Photos Wallpapers Images Pics Collections

Pencil Sketch Photo Photos Wallpapers Images Pics Collections

Pencil
Sketch Photo Photos Wallpapers Images Pics Collections

Pencil
Sketch Photo Photos Wallpapers Images Pics Collections

Pencil Sketch Photo Photos Wallpapers Images Pics Collections

Pencil Sketch Photo Photos Wallpapers Images Pics Collections

Pencil Sketch Photo Photos Wallpapers Images Pics Collections

Pencil Sketch Photo Photos Wallpapers Images Pics Collections

Pencil Sketch Photo Photos Wallpapers Images Pics Collections

Pencil Sketch Photo Photos Wallpapers Images Pics Collections

Pencil
Sketch Photo Photos Wallpapers Images Pics Collections


Pencil Sketch Photo Photos Wallpapers Images Pics Collections

Pencil Sketch Photo Photos Wallpapers Images Pics Collections

Pencil Sketch Photo Photos Wallpapers Images Pics Collections

Pencil
Sketch Photo Photos Wallpapers Images Pics Collections

No comments:
Post a Comment